Hollywood 3D Printing Blog
How to Copy and Reproduce Sculptures in 3 Steps
Learn how 3D Scanning lets you digitize your sculptures and other physical objects, so you can 3D Print them and create silicone molds for making multiple copies of your sculptures.
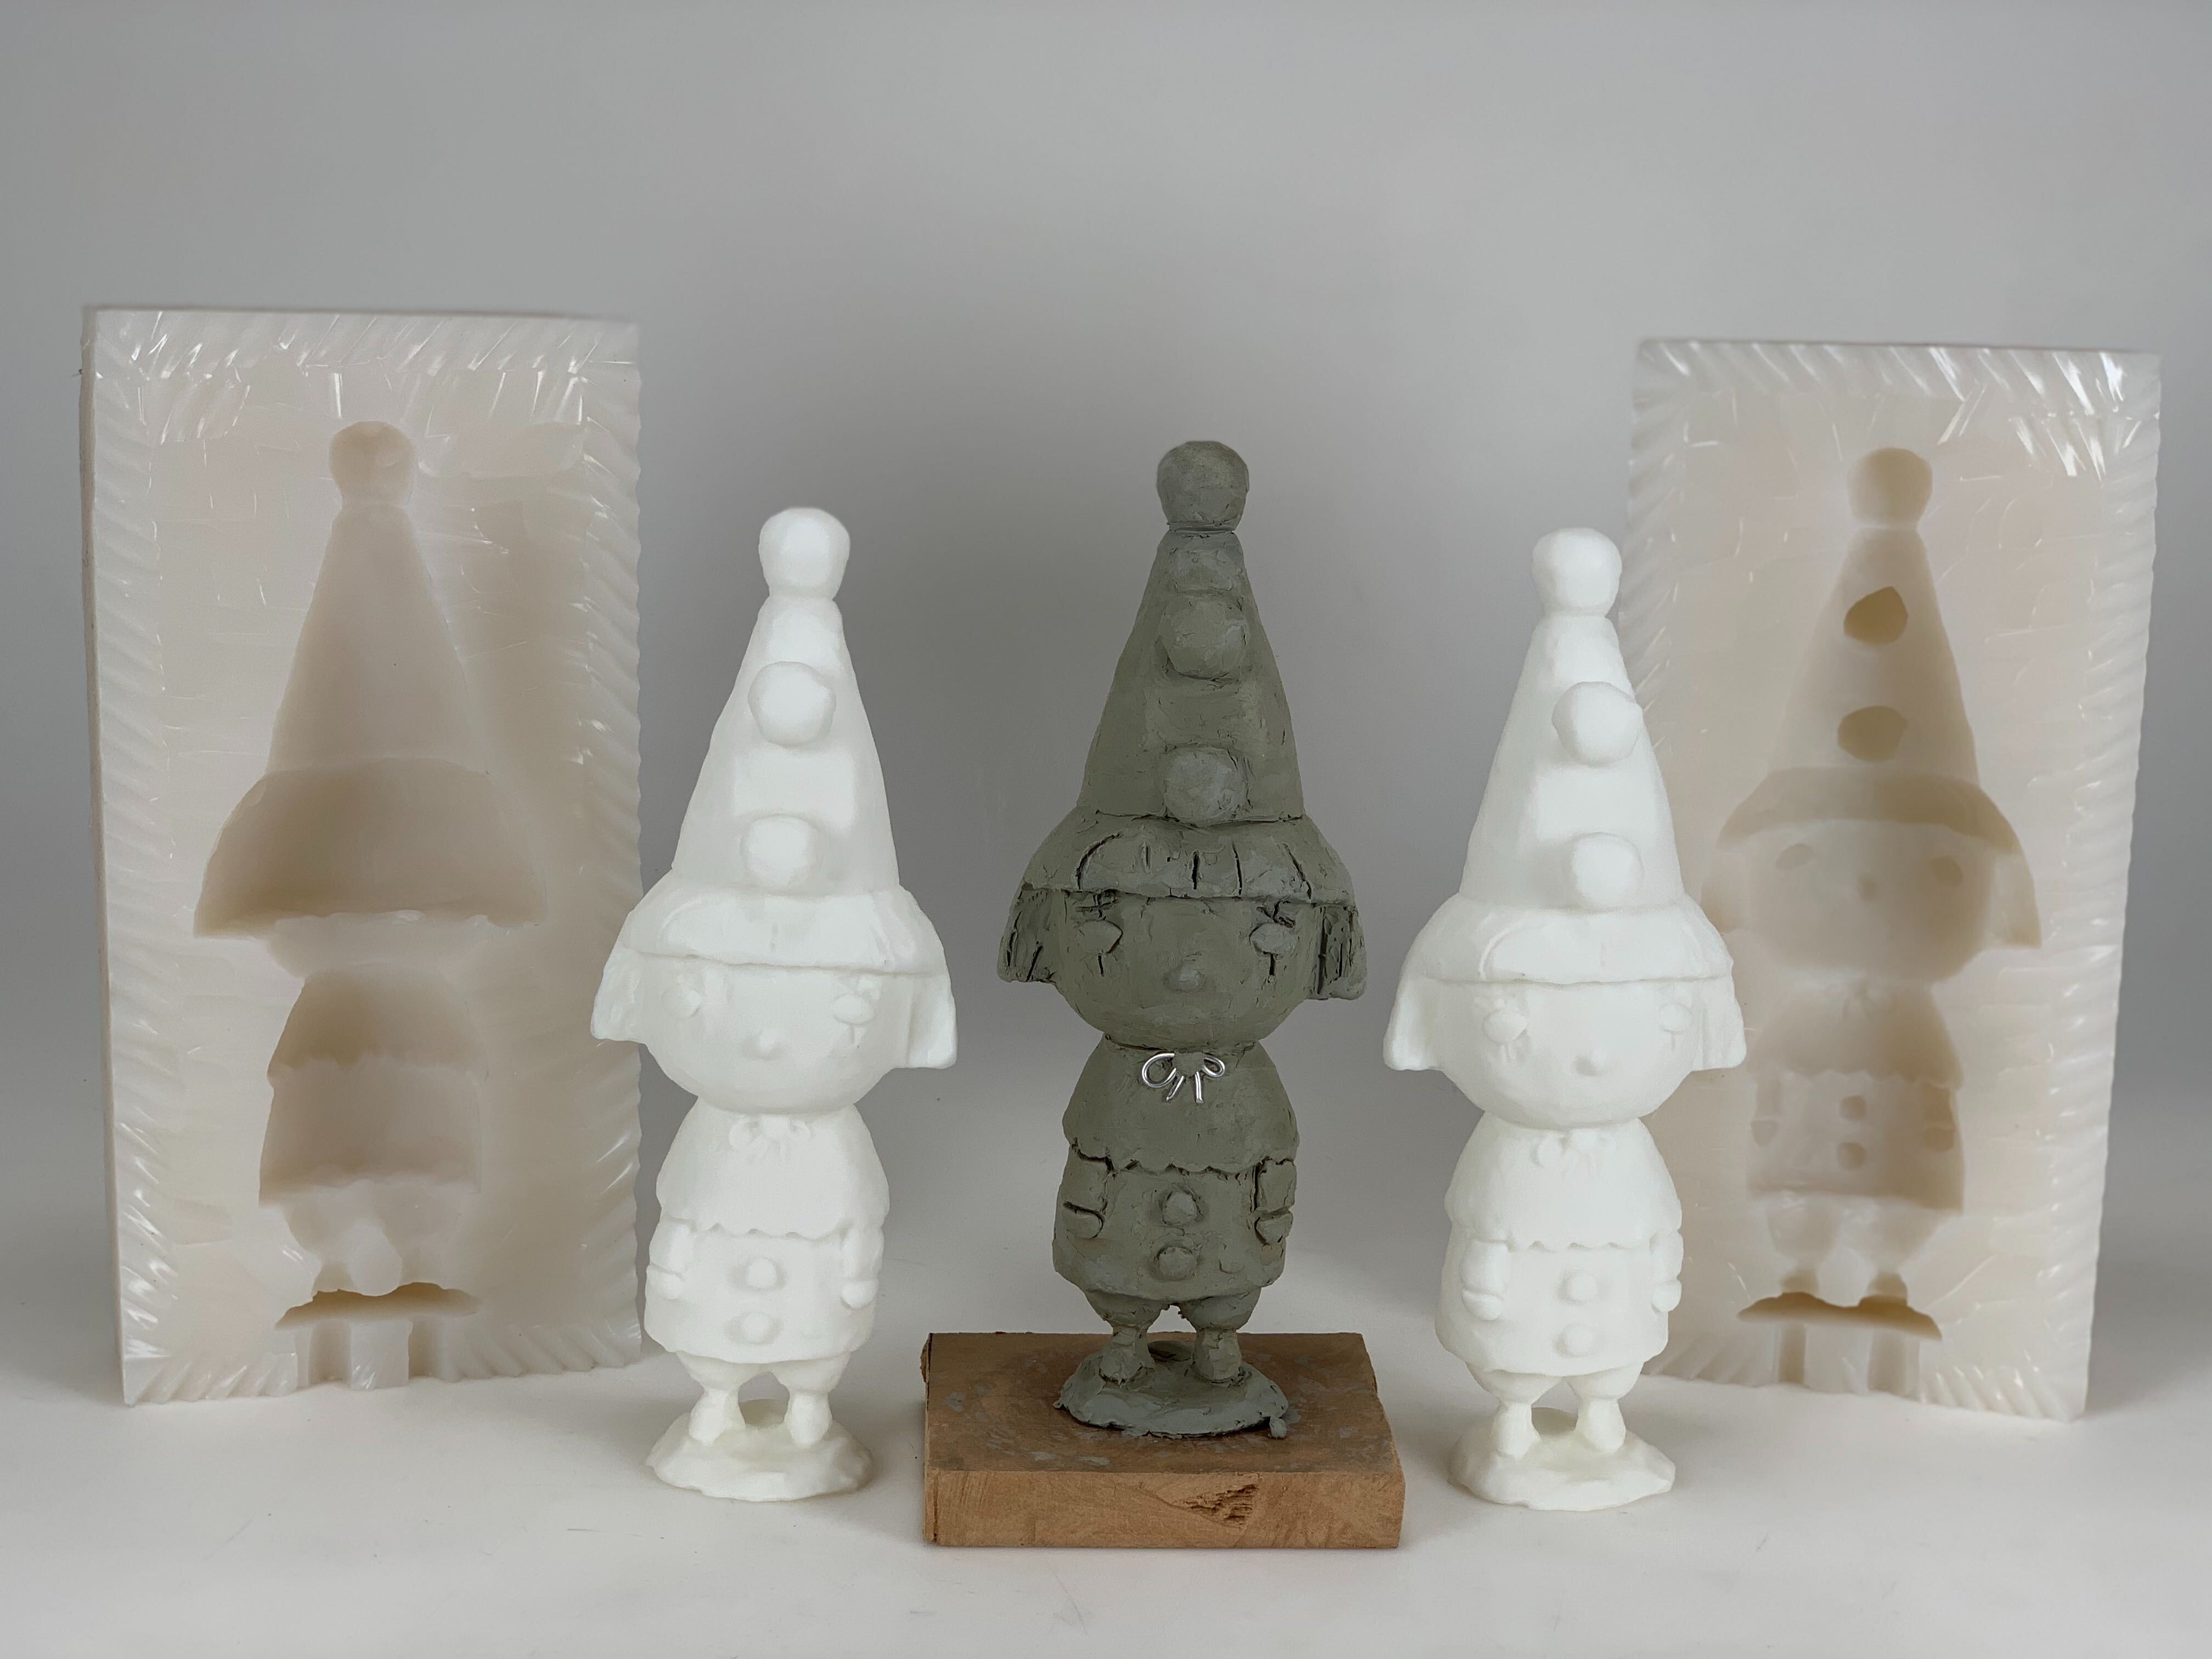
Original sculpture (gray), its 3D Printed mold master parts (white), and the resulting 2-part silicone mold.
So, you want to reproduce your one-of-a-kind sculpture?
Maybe you want a precise 1:1 copy, or maybe you instead want to change the size, modify the appearance, or just clean up the surface before producing multiple copies of your sculpture.
This article will walk you through the three steps required to create multiple copies of sculptural works: digitizing the sculpture, producing a physical master using 3D Printing, and creating a silicone mold for casting reproductions.
If you follow this process, you will end up with three valuable assets -- one from each step. These three assets will allow you to reproduce your artwork, even if your original sculpture is lost or destroyed.
From the first step -- digitizing your sculpture -- you will get a digital 3D Model replica of your artwork. This 3D Model is in STL file format, and is produced from a high-resolution 3D Scan of your sculpture.
Out of the second step -- 3D Printing a master copy of your sculpture -- you will have a perfect physical replica of your original artwork, made in a smooth white plastic material.
Out of the third step -- creating a silicone mold of your sculpture -- you will have the tool you need to produce multiple copies of your sculpture using a pourable casting material, like resin or wax.
Why Artists Are Copying and Reproducing Sculptures
There are many reasons why you might want to copy and reproduce a sculptural work of art -- more reasons than not, actually!
Insurance: When a sculpture is completed, it is a one-of-a-kind object. If this original work is lost or destroyed, it's not possible to reproduce it precisely -- unless you have a digital copy as created by a high-resolution 3D Scan. While it is possible to create
a mold directly from a sculpture, this mold has the same risk as the original sculpture: if it's lost or destroyed, you can never reproduce it perfectly. With a digital 3D Model file, your sculptural work can be stored safely forever (without taking up space in your studio!).
Commercialization: To commercialize your art, you'll want to make multiple copies of your works that are faithful to the original piece, but which don't require your time to create each copy by hand. Reproducing your sculptures with 3D printing and silicone molding reduces
time spent and brings down your production costs.
Changing Size and Scale: If you created a large sculpture but want to produce a smaller version -- or vice versa -- then this is a great reason to follow this guide to digitizing and reproducing your art with 3D printing and silicone molding. Once you digitize your sculpture
with 3D scanning, changing the size can be done instantly; just choose your height and 3D software will automatically resize your object, maintaining all proportionality.
Modifications: After capturing a 3D scan of your sculpture, the digital version can be modified and sculpted in 3D design software. Just as you would work with a piece of clay, your digitized sculpture can be reshaped and redesigned in software, so your original handmade artwork
can remain intact.
Step 1: Digitize Your Sculpture with 3D Scanning
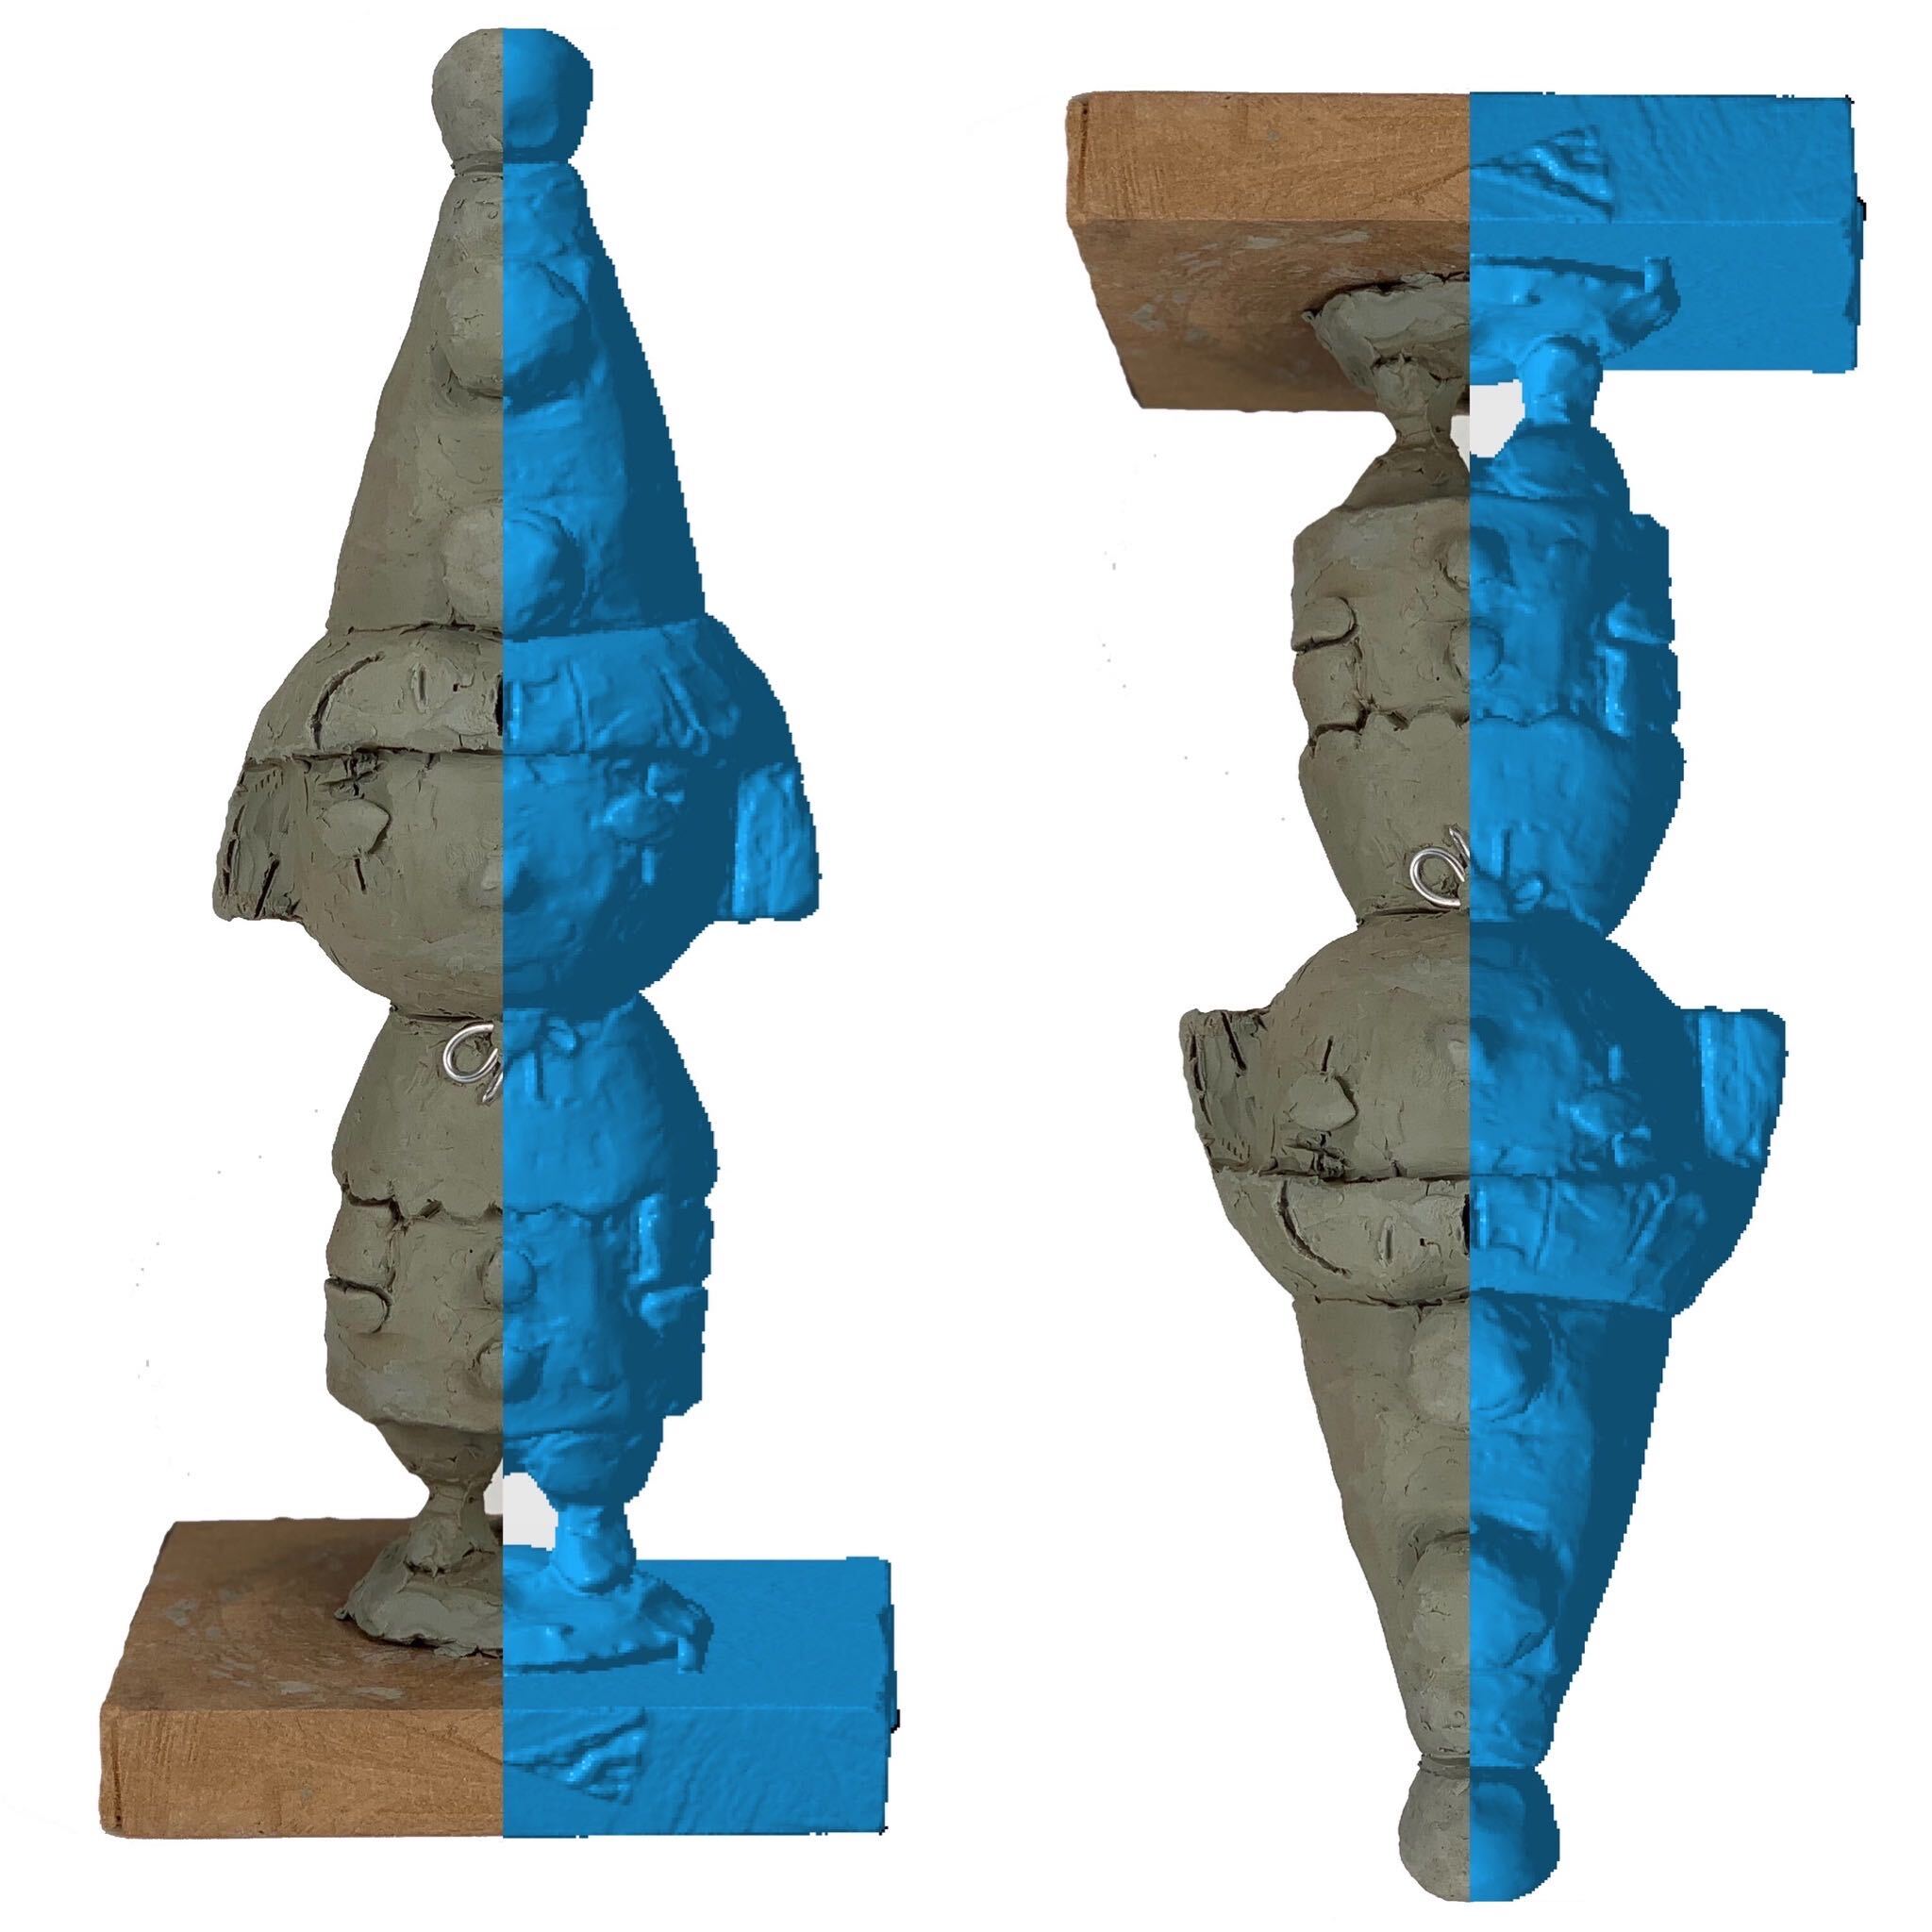
Original clay sculpture (gray), superimposed with its digital 3D scanned copy (blue)
The first step in copying and creating sculpture replicas is to obtain a high-resolution 3D Scan of your original artwork.
3D Scanning is a process by which a specialized device -- a 3D Scanner -- sends out several fast bursts of light, and measures the light patterns that are reflected back by the object you are scanning. A 3D Scanner contains electronics which analyze the difference between the emitted light pattern and the reflected light pattern, and determines
the shape of your object based on these differences.
The 3D Scanning process results in a precise digital copy of your object, contained in a 3D Model file in STL file format. This STL file can be further modified or resized in a digital sculpting software like ZBrush.
If you're ready to start 3D Scanning, check out our online quote tool where you can upload images of your part to be scanned and describe any digital modifications you need.
Once you have your 3D Model file in STL format, you're ready for the next step: producing the physical mold master with 3D Printing.
Step 2: Create "Master" Part with 3D Printing
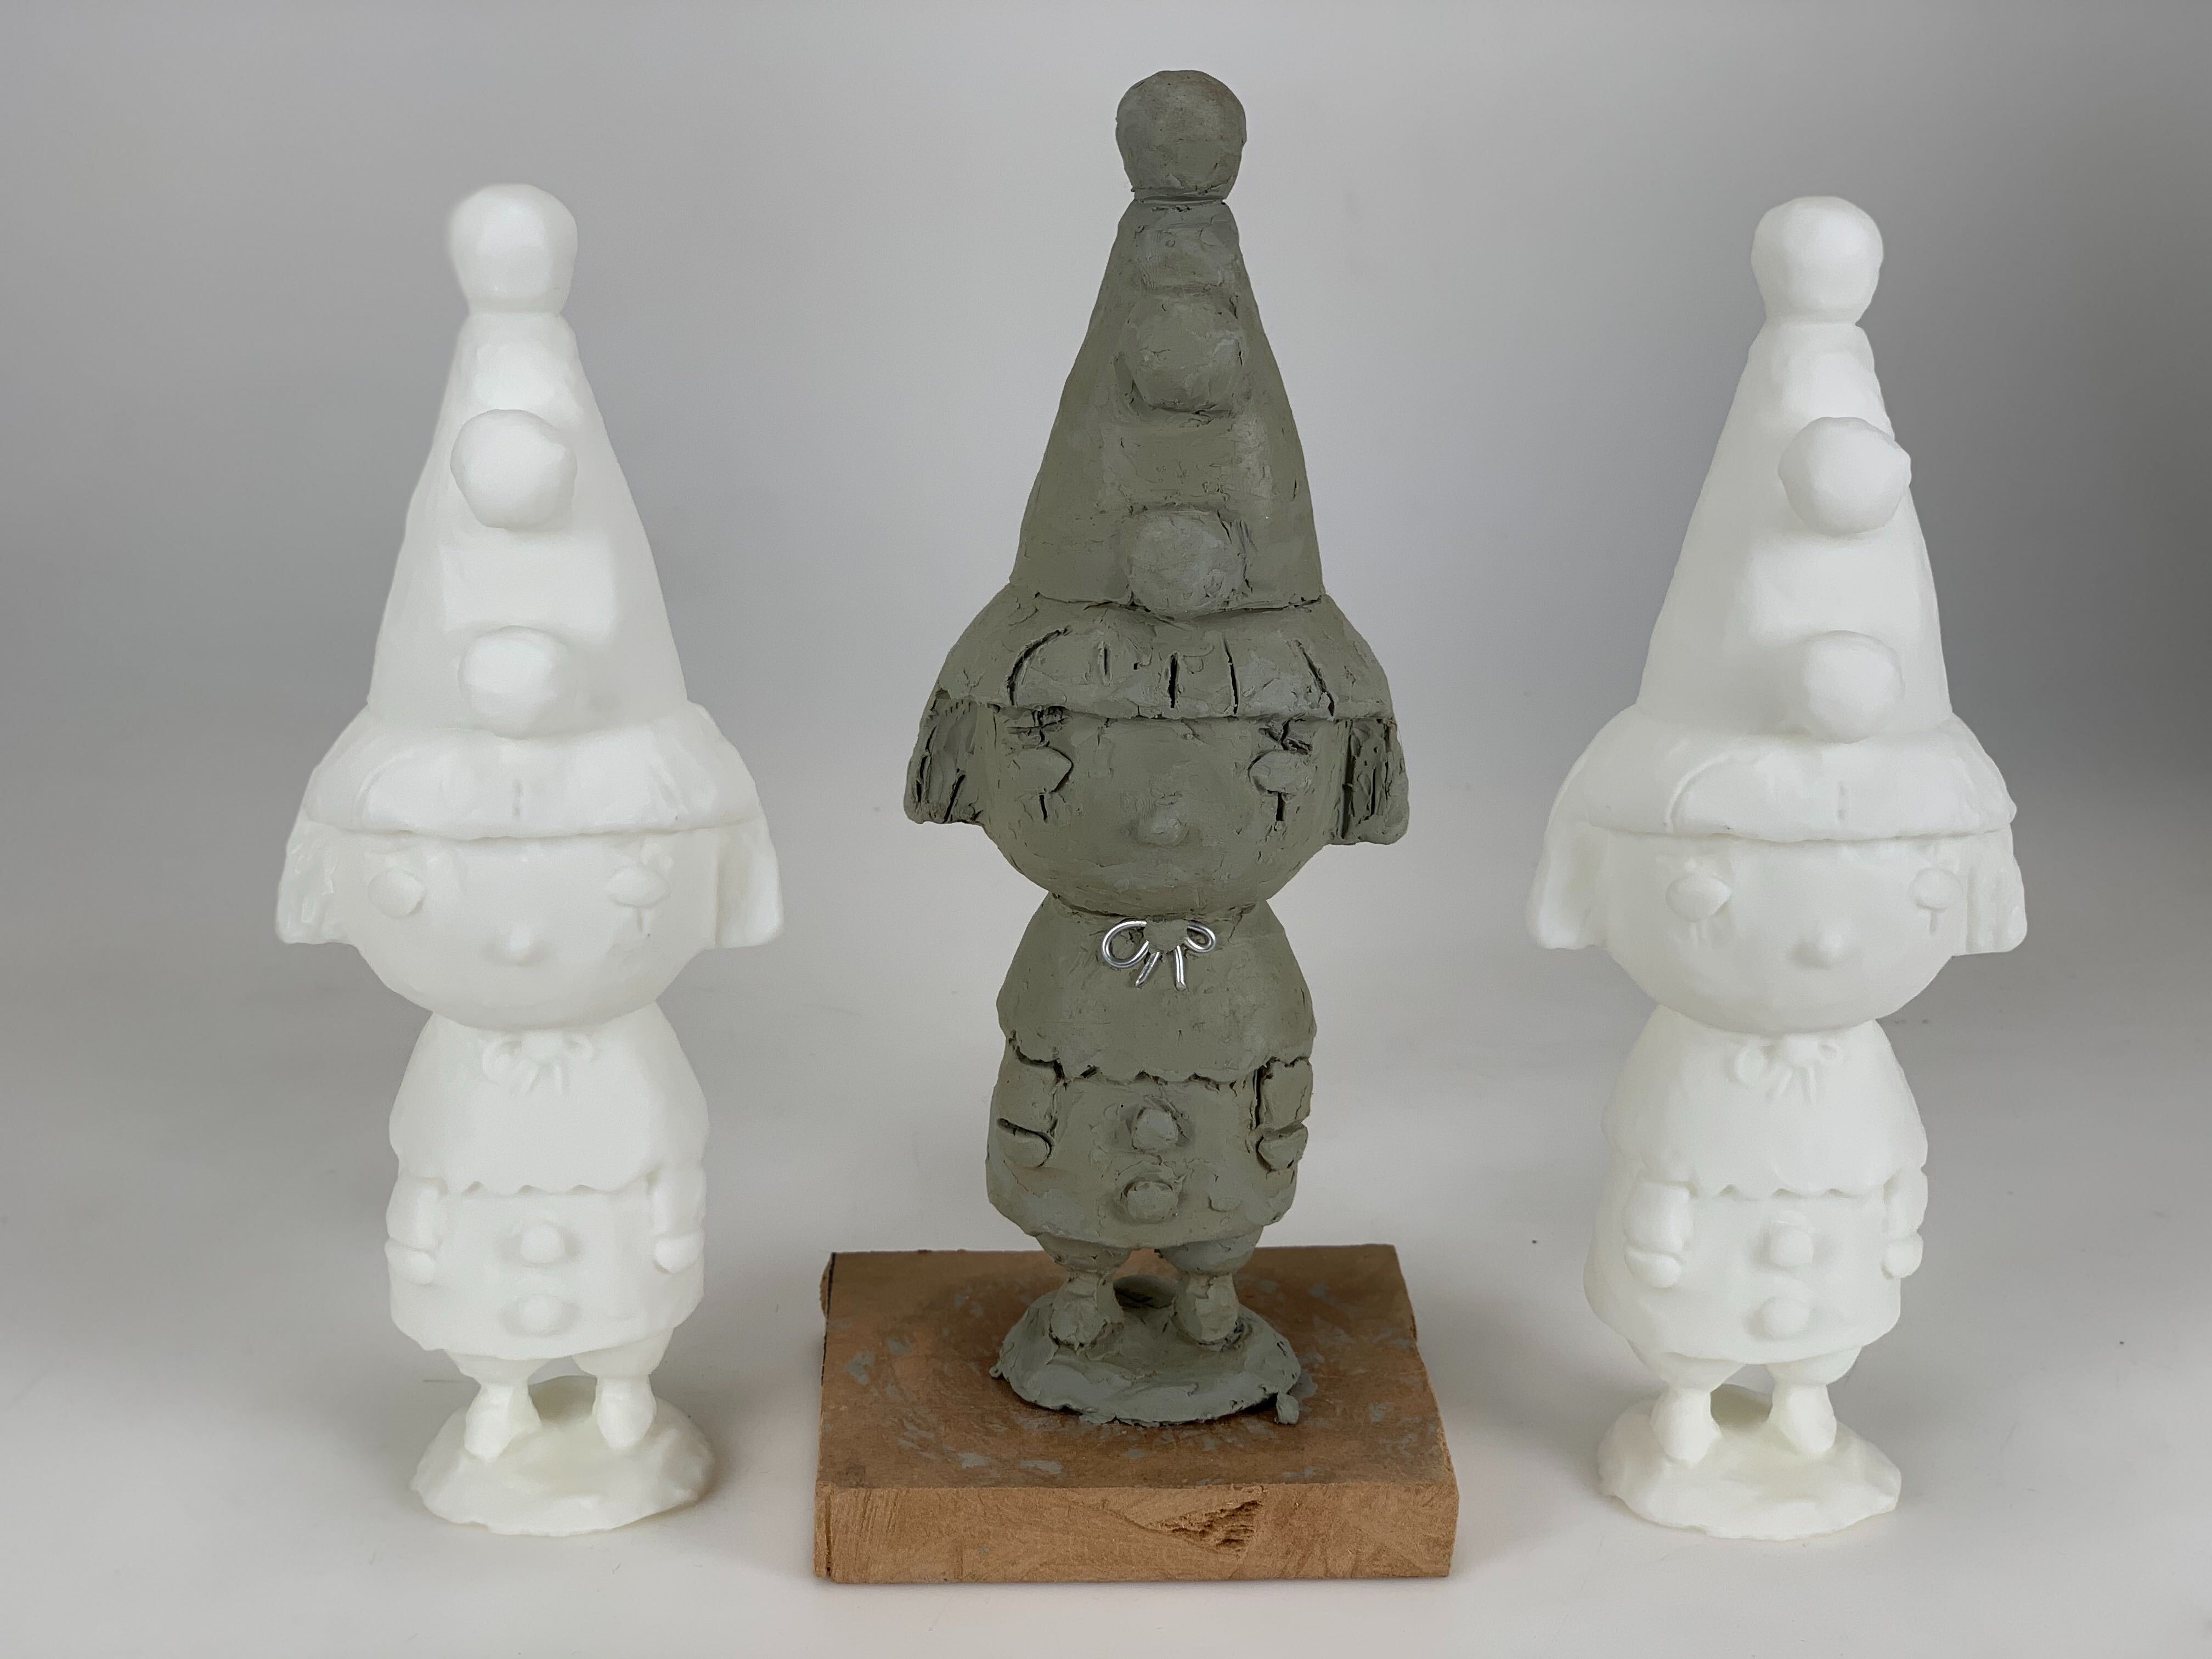
Original clay sculpture (gray), 3D Printed master copies in SLA Resin (white)
In moldmaking, the original object used to create a mold is called the "master" part. A master part should be a visually perfect version of the final parts that you want to cast from your mold, and for this
reason, you'll want to choose the smoothest plastic available with 3D Printing: SLA Resin.
With your STL file, you're ready to order a 3D Print in SLA Resin -- just head over to our online quoting tool or request a custom quote. Within a few days, you'll have your high-resolution mold master part in smooth
white SLA resin.
Once you have a perfect object to serve as your master part for the moldmaking process, you're ready for the final step in getting set up for creating copies of your sculpture using 3D Printing and moldmaking.
Step 3: Create a Silicone Mold from Master 3D Printed Part
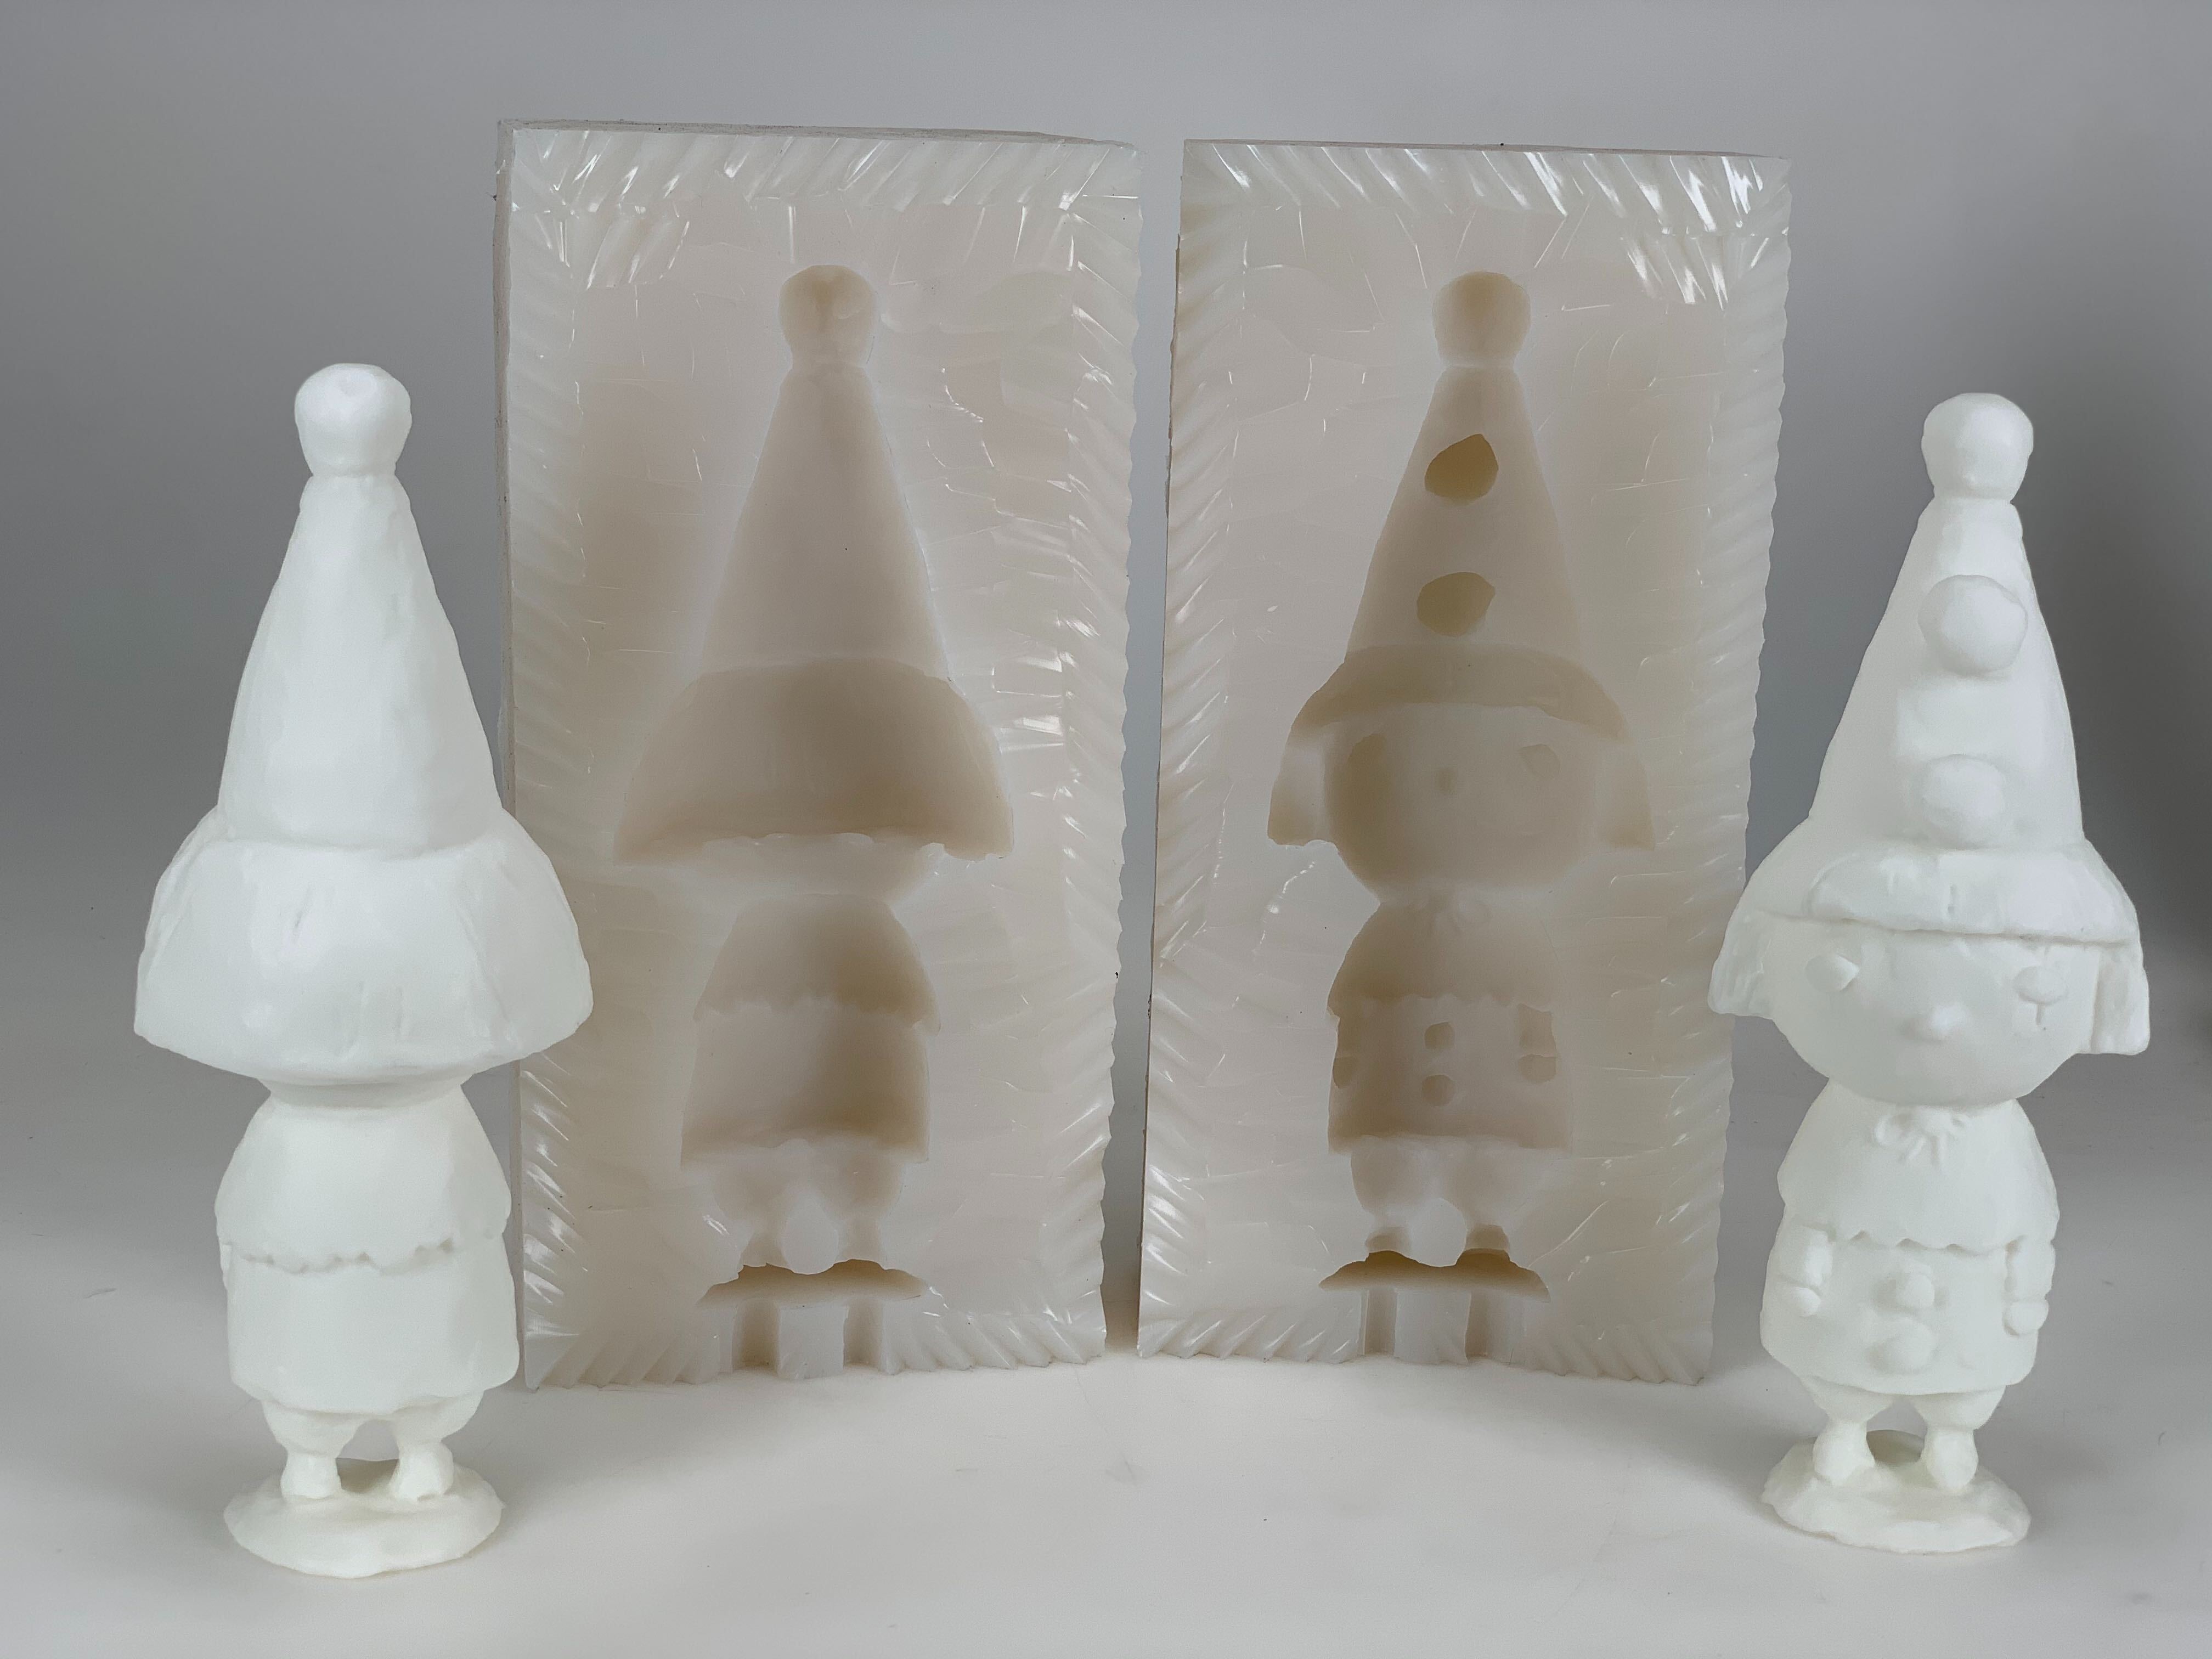
3D Printed master part (two shown for front/back detail), with its resulting 2-part silicone mold.
Producing a silicone mold from a physical master object can be broken down into four steps. The process is summarized below, but the Smooth-On tutorials are an excellent in-depth resource.
Step 1: Build a box and secure your part with casting pour spouts. Using a hot glue gun and pieces of square-cut foam core boards -- or any inexpensive rigid flat material -- construct a five-sided box with an open top and fully-sealed seams. The width, length, and depth of this box should be chosen
such that when your master part is placed in the center of the box, there is at least 0.5" clearance all around and above the part. This ensures that when you pour the silicone into this container, there will be enough thickness so you don't have thin mold walls that risk tearing.
Step 2: Secure your part inside the box. Easy, right? Just hot-glue your master part to the inside base of your box. This can be tricky for parts which don't have a nice flat bottom -- in this case, you want to adhere cylindrical dowels to the base of your mold box. Then, adhere your part to the ends of these dowels
such that your part is held up by these dowels like it's standing on "stilts." When you remove your parts and these dowels from the finished silicone mold, the space left behind by the dowels will create a nice spout hole for pouring in your casting material.
Step 3: Mix and pour silicone. Two-part platinum cure silicone from Smooth-On is recommended. Simply mix equal parts of the silicone and pour into the open top of your mold box. You'll want to pour slowly, so the silicone
falls in a thin stream, hitting the inner bottom surface of your mold box (don't pour the silicone directly onto your part!). Pouring the silicone in a thin stream ensures there are no large bubbles being trapped in the silicone as it cures into rubber -- bubbles are bad, so pour slowly and evenly.
Step 4: Cut open the mold and remove your master. When your silicone is fully cured, break off and remove the walls and base of your mold box. Carefully slice a scalloped pattern all the way around the perimeter of your silicone mold block. Go slowly, gently spreading the silicone as you cut all the way through to the surface of your master part.
Cutting in a scalloped pattern ensures that your mold halves will line up perfectly each time you make a casting, because the rubber grooves will interlock to their original alignment.
Moldmaking can be messy, and it takes time and practice to produce good working molds which give you repeatable casting results.
To save yourself the DIY hassle, contact us for a custom moldmaking quote.
Get Inspired
Browse through hundreds of examples of our 3D printing, 3D design, and custom fabricated builds.